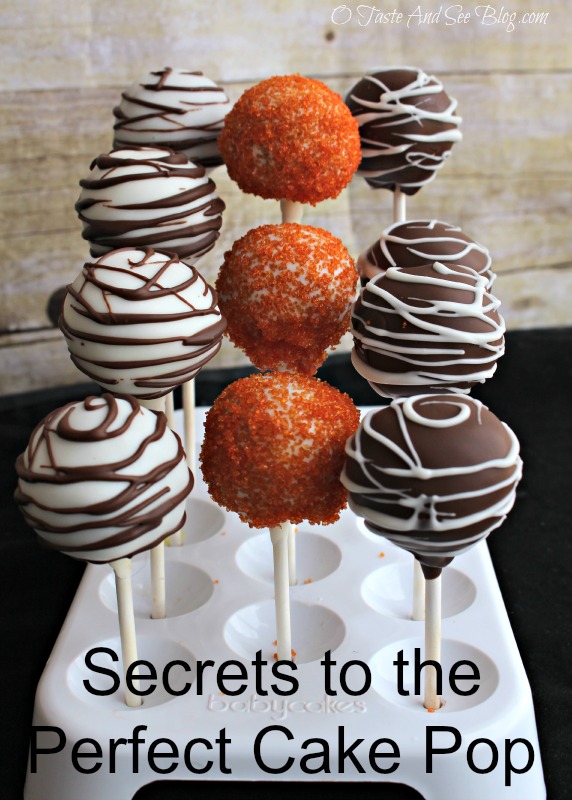
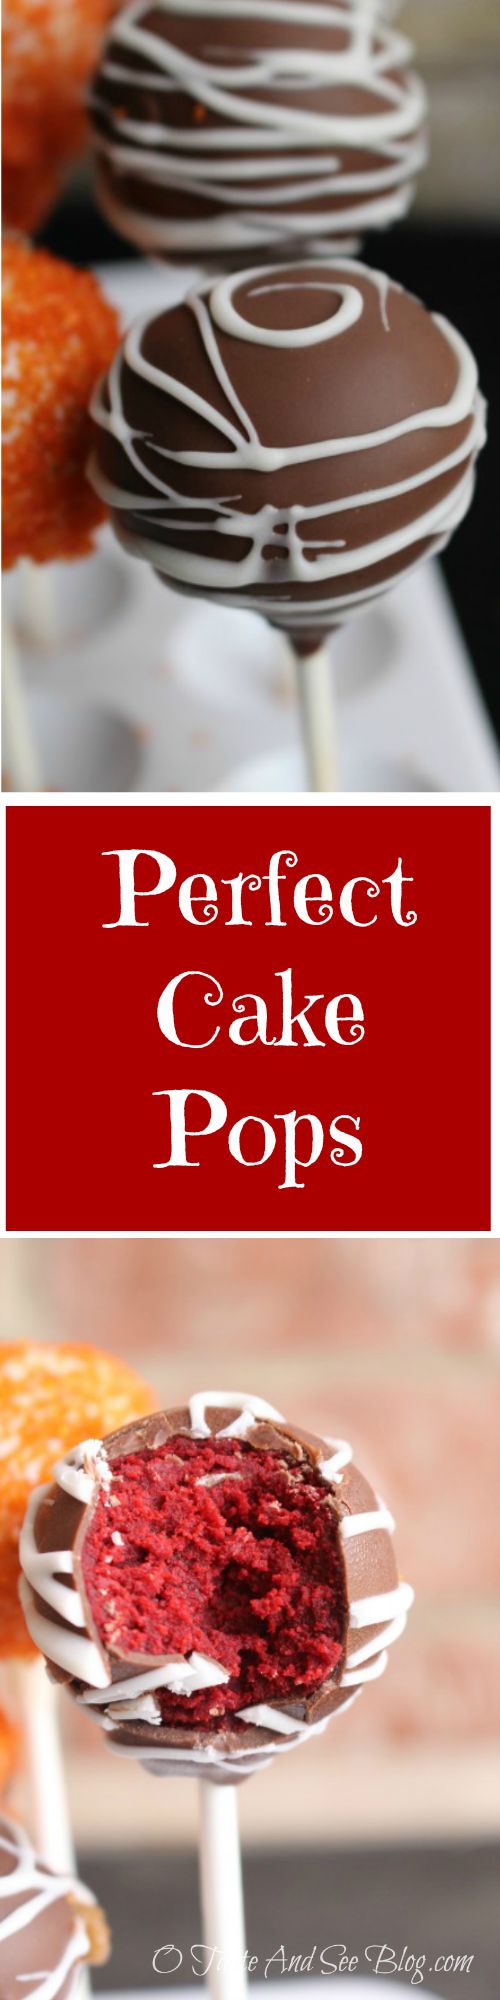
10 Secrets to the Perfect Cake Pops
Cake pops are super popular right now and fun to make and eat.
Today, I’m going to share with 10 Secrets to the Perfect Cake Pop….and I have a Guest Baker to help!

Meet Rosebud, of Rosebud Bakery. She’s a talented baker and cake decorator, sweet young lady and friend.
When my daughter requested Cake Pops for her Graduation Reception I knew right away who I needed to call. Rosebud’s Cake Pops are moist, delicious AND they look amazing! She makes her own sugar sprinkles so I was able to request Cake Pops to match our party colors….have I mentioned how much I LOVE food that matches a color scheme?!
Making Cake Pops requires several steps and it can be a little time-consuming. Having a friend or family member to help would be a great activity and time saver. But, if you’re making them by yourself there’s good news….they can be done over two or three days. Bake the cakes one day, make them into balls the next and dip and decorate on the third day. The candy coating seals them and keeps them moist so as long as they’re covered they will keep a couple of days before serving.
Rosebud’s Secrets to the Perfect Cake Pops are very helpful and will insure success!
Here’s the Recipe:
- 1 box cake mix (any flavor)
- Ingredients to prepare cake mix (usually oil or butter, eggs and water)
- tub frosting in a flavor to complement the cake – NOT whipped (only 1/2 can is needed)
- cake pop sticks
- candy coating (recommended instead of baking chips, we used Candyquik)
- Cake Pop holder or Styrofoam board for holding upright while they dry
- Optional: Sprinkles for decorating
***For this post we made Red Velvet and Carrot Cake. With the Red Velvet we used white cream cheese frosting and dipped in chocolate candy coating. For the Carrot we also used white cream cheese frosting but dipped in white candy coating. In this post you’ll see photos from both.***
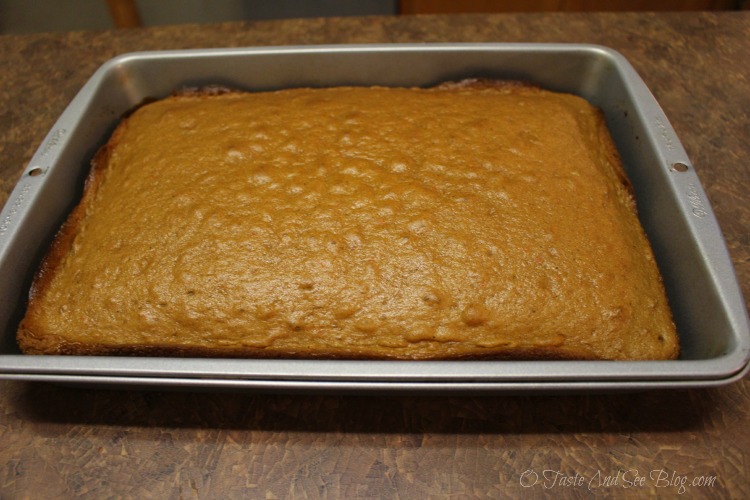
Bake cake according to package directions
(Any shape or pan is fine)
Cool completely
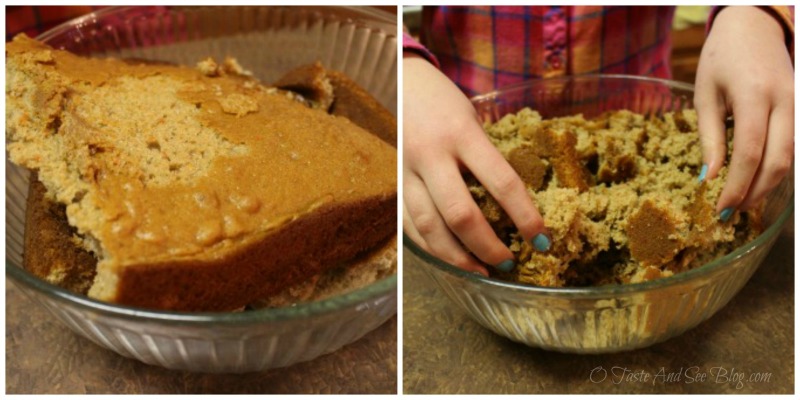
In a large bowl, crumble cake with hands
Crumbs should be very fine. This is best done by rolling between hands
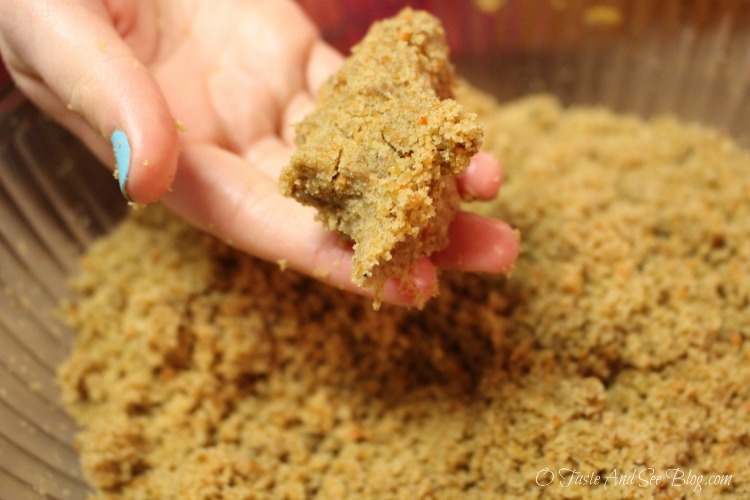
Perfect Cake Pop Secret #1: Crumbs are fine enough when cake sticks together and forms a ball when squeezed in hand
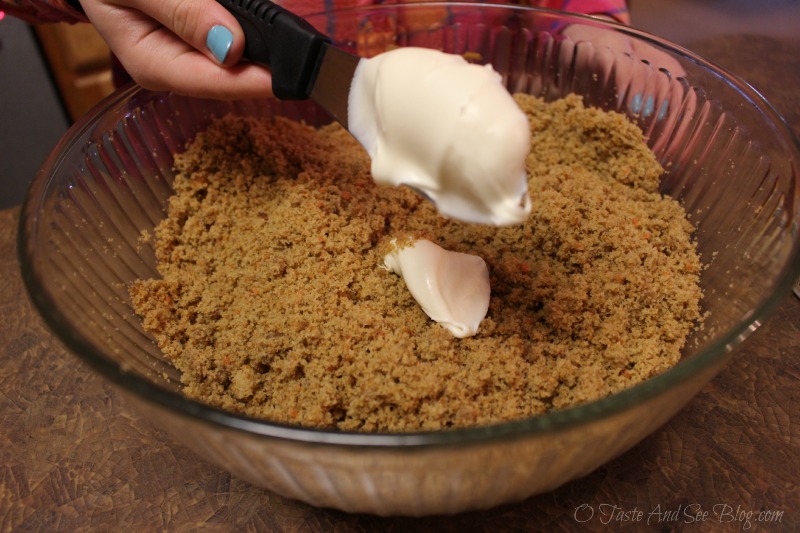
Begin adding icing, one scoop at a time

Mix with hands until fully incorporated
*It may get messy, but it’s worth it!*
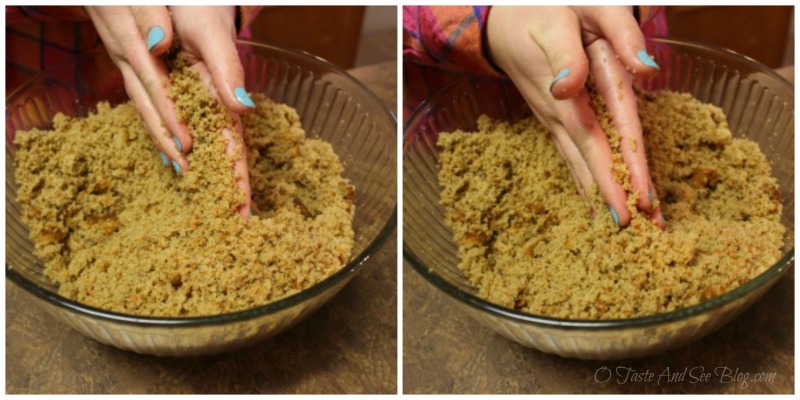
Continue to add more icing and mix completely, checking after each addition
Perfect Cake Pop Secret #2: You only need about 1/2 the can of frosting
Perfect Cake Pop Secret #3: Getting mixture the right consistency….

Roll a small amount of mixture into a ball
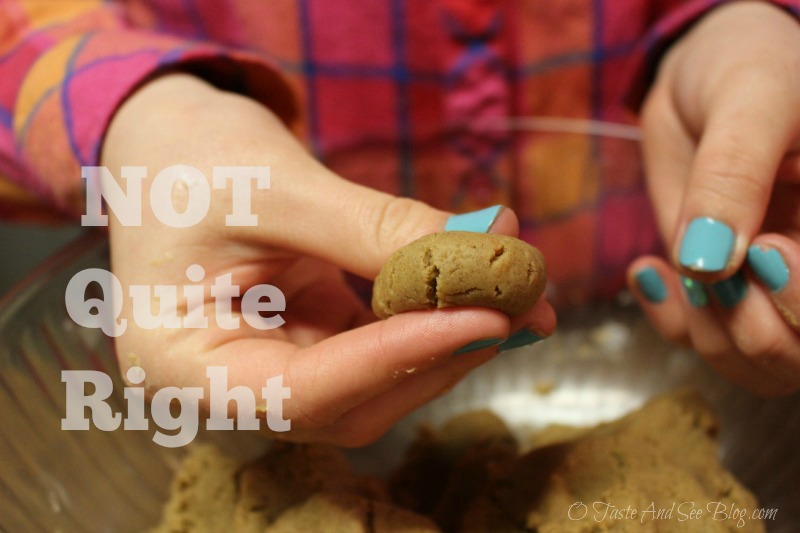
Holding ball between thumb and fingers, gently squeeze the back of the ball
IF cracks appear in the front of the ball IT’S NOT READY…this one is NOT ready
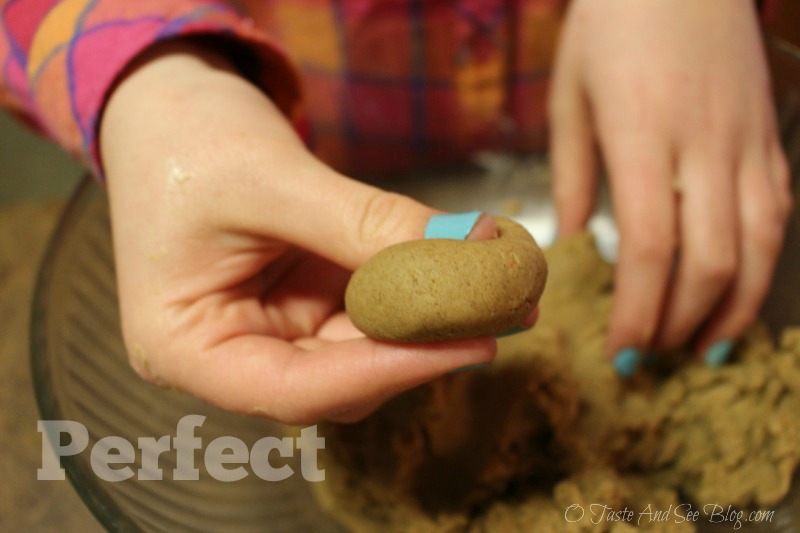
Add more icing a little at a time, mix and repeat until…
NO cracks appear when squeezed….This one IS perfect!
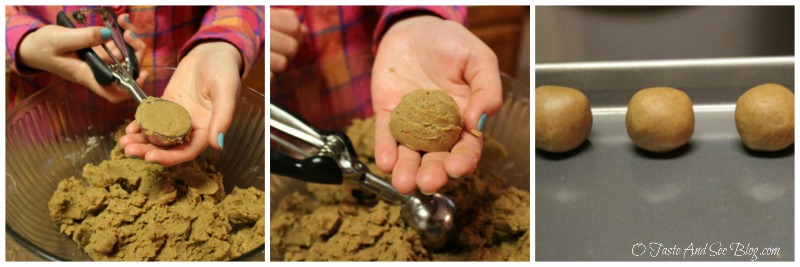
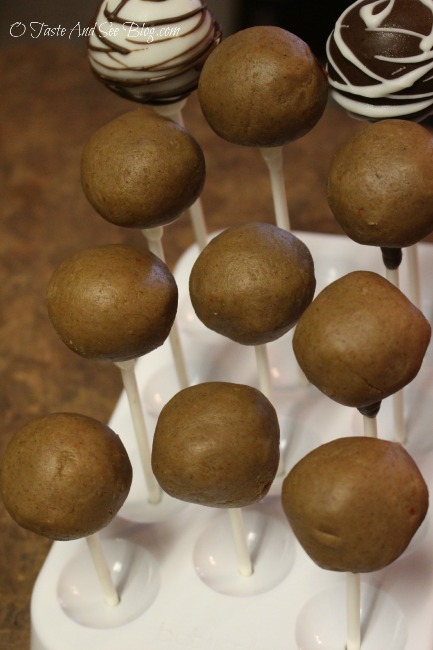
Using a 2 inch cookie scoop, form mixture into about 30 cake balls
Place on a cookie sheet and into refrigerator for about 4 hrs
At this point you can continue on with dipping the Cake Pops or cover and freeze until ready to dip
*They can be kept in the freezer a couple of days, however,
Perfect Cake Pop Secret #4: DO NOT DIP straight out of freezer.
They will be too cold and candy coating will crack when it hardens. If freezing, remove from freezer and place in refrigerator for at least two hours before dipping*
Perfect Cake Pop Secret #5: Keep balls in refrigerator until ready to dip, taking out only a few at a time. It’s important for them to stay cool. If they get too warm they will fall off the stick when dipped.
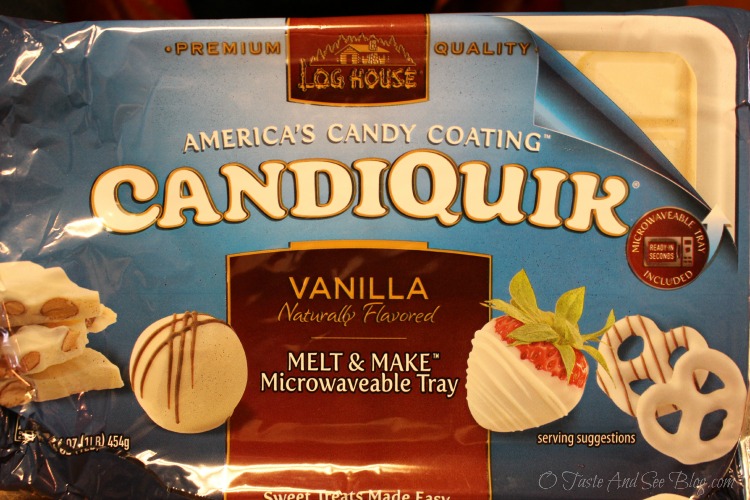
Perfect Cake Pop Secret #6: Use Candyquik instead of regular chocolate or almond bark
Melt candy coating in microwave, according to directions on package
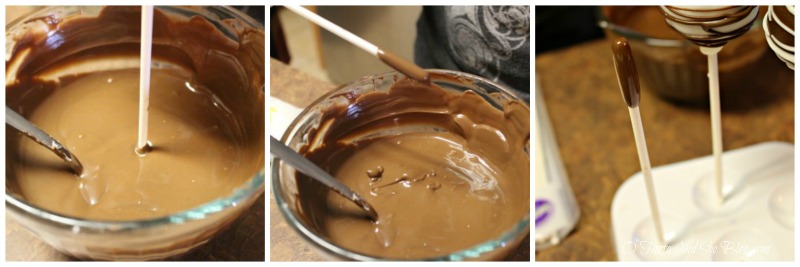
Perfect Cake Pop Secret #7: Seal the tip of the stick before adding Cake Ball
Dip each cake pop stick about 3/4 in. in the melted Candyquik
Allow extra to drip off then place cake pop stand
*This is done to seal the sticks and keeps oils from cake pops from running down the stick and causing it to yellow*
Allow to dry about 10 minutes
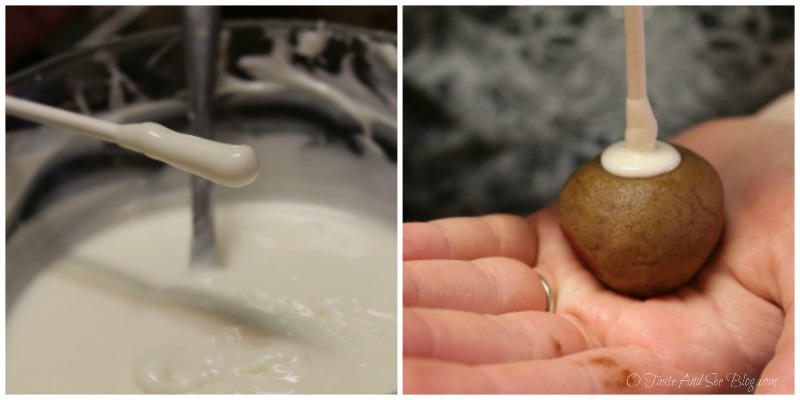
The side of the cake ball that was on the cookie sheet will be flat, that’s the side you want to put the stick in
When sticks are ready take out a few cake balls and begin to dip
Dip sticks again in Candyquik then immediately into flat side of cake ball
**Best done holding hand flat and placing cake ball in palm. Insert stick about 1/2 in into ball**
Perfect Cake Pop Secret #8: Gently tap ball in hand to spread the chocolate out and form a seal
**We used chocolate and vanilla Candyquik. Although the pictures show different flavors, keep flavor consistent when dipping***
Place back into cake pop stand to dry
At this point, take a moment to gently reshape any balls that have become slightly misshapen
Allow to sit about 10 minutes
If cake balls seem to be getting too warm, put back in refrigerator to chill before dipping
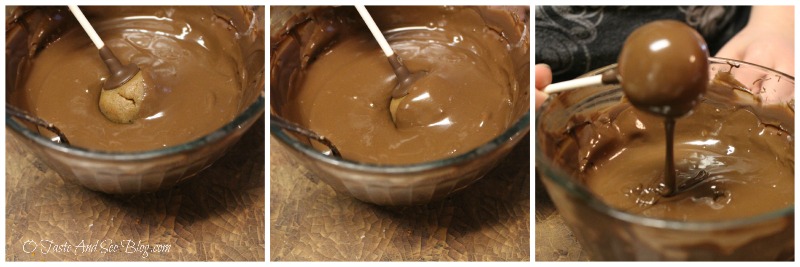
One at a time, dip cake pops into melted Candyquik, and swirl to coat
Perfect Cake Pop Secret #9: Do not cover all the way to the stick, being very careful NOT to cover the seal completely. If the seal is covered the warm coating will cause it to melt and pop can fall off the stick
Allow excess coating to drip off by tapping gently on side of bowl,
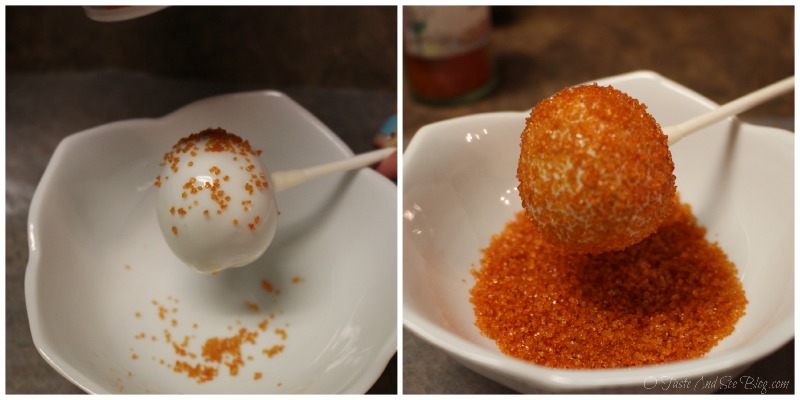
If covering with sprinkles, hold over a small bowl and cover while coating is wet
Then place back in cake pop stand to harden
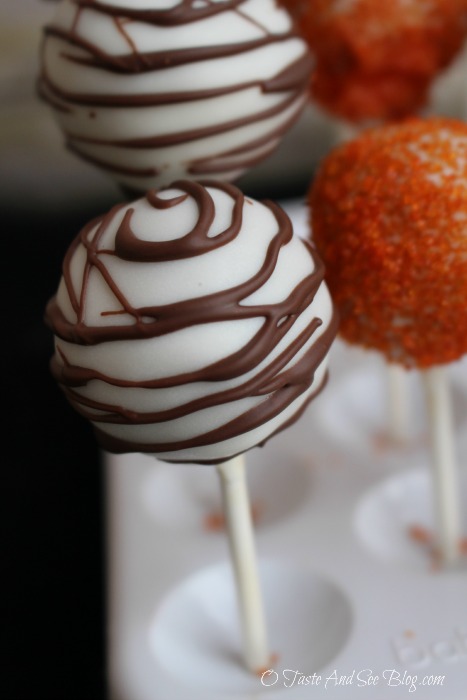
If decorating with stripes, first allow coating to harden completely
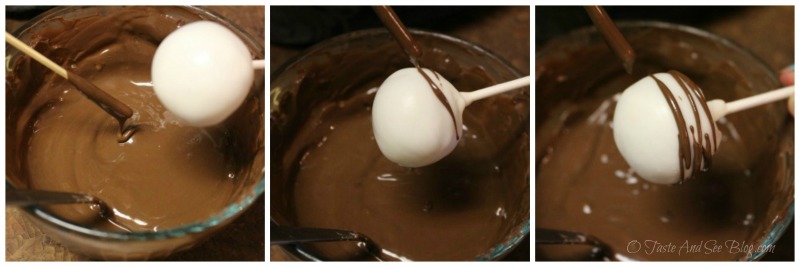
Perfect Cake Pop Secret #10: Decorating with stripes of opposite flavor candy coating
Using the flat end of a wooden skewer, dip in opposite color Candyquik
Holding over bowl of melted Candyquik, turn cake pop and drizzle with opposite color
Replace in stand and allow to harden
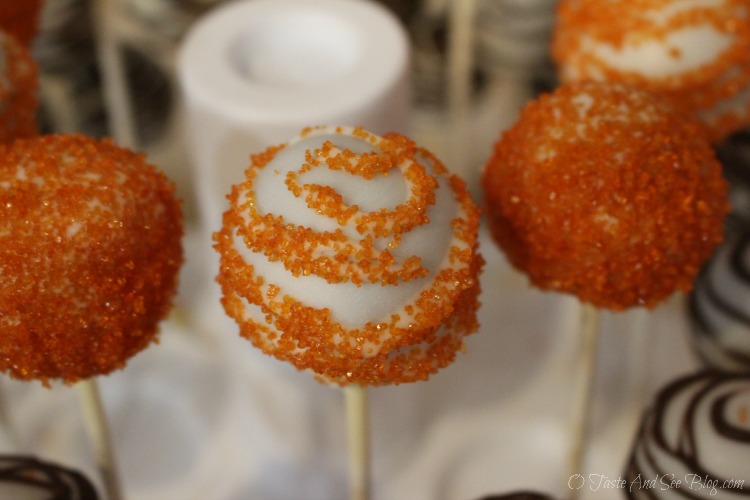
Or drizzle with the same color coating and sprinkle with sprinkles while wet
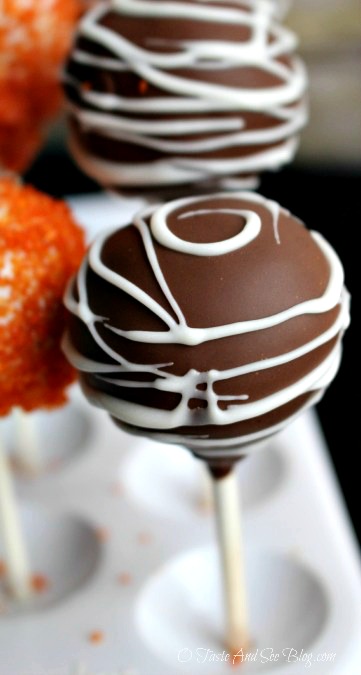
Beautiful on the outside….
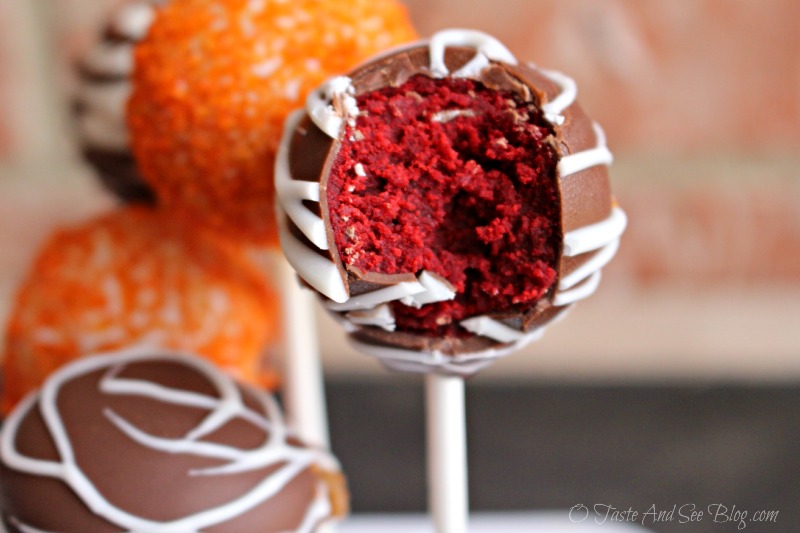
Moist and creamy on the inside!
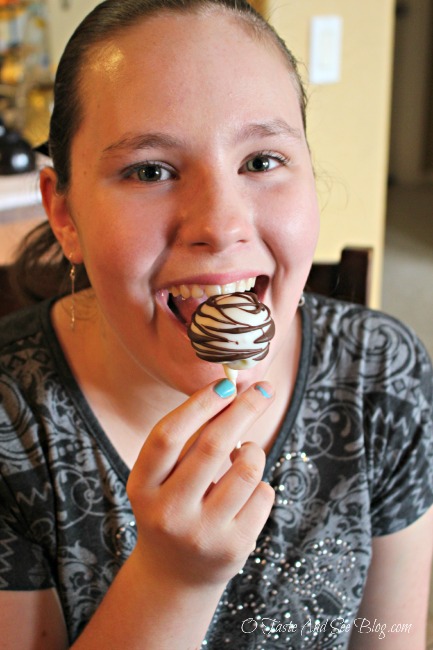
Of course, after making them we HAD to have a sample!
Thanks again, Rosebud, for being our guest baker and sharing your 10 Secrets to the Perfect Cake Pops!
For more of Rosebud’s beautiful creations check out Rosebud Bakery on Facebook and let her know you stopped by liking her page!

- 1 box cake mix (any flavor)
- Ingredients to prepare cake mix (usually oil or butter, eggs and water)
- tub frosting in a flavor to complement the cake – NOT whipped (only 1/2 can is needed)
- cake pop sticks
- candy coating (recommended instead of baking chips, we used Candyquik)
- Cake Pop holder or Styrofoam board for holding upright while they dry
- Optional: Sprinkles for decorating
- Bake cake according to package directions
- (Any shape or pan is fine)
- Cool completely
- In a large bowl, crumble cake with hands
- Crumbs should be very fine. This is best done by rolling between hands (See Secret #1)
- Begin adding icing, one scoop at a time
- Mix with hands until fully incorporated
- Continue to add more icing and mix completely, checking after each addition (See #2 & 3)
- Using a 2 inch cookie scoop, form mixture into about 30 cake balls
- Place on a cookie sheet and into refrigerator for about 4 hrs
- At this point you can continue on with dipping the Cake Pops or cover and freeze until ready to dip (See #4 &5)
- Melt candy coating in microwave, according to directions on package (See #6)
- Seal the tip of the stick before adding Cake Ball (See #7) by dipping each cake pop stick about 3/4 in. in the melted Candyquik
- Allow extra to drip off then place cake pop stand
- Allow to dry about 10 minutes
- The side of the cake ball that was on the cookie sheet will be flat, that’s the side you want to put the stick in
- When sticks are ready take out a few cake balls and begin to dip
- Dip sticks again in Candyquik then immediately into flat side of cake ball
- Best done holding hand flat and placing cake ball in palm. Insert stick about 1/2 in into ball and gently tap. (See #8)
- Place back into cake pop stand to dry
- At this point, take a moment to gently reshape any balls that have become slightly misshapen
- Allow to sit about 10 minutes
- If cake balls seem to be getting too warm, put back in refrigerator to chill before dipping
- One at a time, dip cake pops into melted Candyquik, and swirl to coat
- Do not cover all the way to the stick (See #9)
- Allow excess coating to drip off by tapping gently on side of bowl
- If covering with sprinkles, hold over a small bowl and cover while coating is wet
- Then place back in cake pop stand to harden
- If decorating with stripes, first allow coating to harden completely (See #10)
- #1: When crumbling cake, crumbs are fine enough when cake sticks together and forms a ball when squeezed in hand
- #2: You only need about 1/2 the can of frosting
- #3: Getting mixture the right consistency
- Roll a small amount of mixture into a ball
- Holding ball between thumb and fingers, gently squeeze the back of the ball
- IF cracks appear in the front of the ball IT’S NOT READY…this one is NOT ready
- Add more icing a little at a time, mix and repeat until…
- NO cracks appear when squeezed
- #4: DO NOT DIP straight out of freezer. They will be too cold and candy coating will crack when it hardens. If freezing, remove from freezer and place in refrigerator for at least two hours before dipping
- #5: Keep balls in refrigerator until ready to dip, taking out only a few at a time. It’s important for them to stay cool. If they get too warm they will fall off the stick when dipped.
- #6: Use Candyquik instead of regular chocolate or almond bark
- #7: Sealing the tip of the stick is done to keep oils from cake pops from running down the stick and causing it to yellow
- #8: Gently tap ball in hand to spread the chocolate out and form a seal. This helps secure the ball to the stick
- #9: When dipping Cake Pop DO NOT cover the seal completely. If the seal is covered the warm coating will cause it to melt and pop can fall off the stick
- #10: Decorating with stripes of opposite flavor candy coating
- Using the flat end of a skewer, dip in opposite color Candyquik
- Holding over bowl of melted Candyquik, turn cake pop and drizzle with opposite color
- Replace in stand and allow to harden
This post was linked at Pretty Pintastic Link Party, Over the Moon, Recipe & DIY linkup, Let’s Get Real Linkup, Pin Me link party, and Create Link Inspire.
31 Comments
Sherry
February 25, 2022 at 10:21 PM
Hi Danita, love your post and you covered everything pretty good. Hope to try these Sunday in a cooking class I’m conducting for our youth at church.
I was curious why there are so many ads on these post. It’s really hard to see content especially your post. I assume you get paid to show these ads? I noticed recently there are more and more popping up. Thanks
Danita
May 22, 2022 at 7:18 AM
Interesting about the ads. No, I actually don’t have ads that pay for the very reason …. I navigate away from sites that are full of ads. Thanks for making me aware, I will check into it. Probably a plug-in I need to turn off.
Tess
February 29, 2020 at 1:16 PM
Can I use the cake pop machine instead of using my hands ?
Danita
March 14, 2020 at 10:03 AM
I’m not familiar with the cake pop machine but I’m guessing it would still work with this recipe.
Amber
November 21, 2018 at 9:33 PM
This tip got me in trouble 🙁 I’ve never made cake pops before so I was excited to try! I was so worried not to cover the seal that there was a small gap between the seal and the coating. I was almost done with making these when I realized that ALL my pops were leaking oil down the stick….I had to patch them, but that didn’t fix the issue fully. I really wish it was mentioned somewhere that it’s VERY important to cover the entire cake.
Perfect Cake Pop Secret #9: Do not cover all the way to the stick, being very careful NOT to cover the seal completely. If the seal is covered the warm coating will cause it to melt and pop can fall off the stick
Lori Kauffman
October 22, 2016 at 12:14 PM
Thanks for such great instructions!! I always host Thanksgiving, and have been looking for something different and fun for dessert. I think I’ll use these tips to try my hand at pumpkin cake pops. I’m off to the kitchen!!
~~Lori
Danita
October 22, 2016 at 12:53 PM
Those sound wonderful! Glad I could help. Thanks for stopping by!
twopurplecouches
July 16, 2016 at 4:02 PM
I haven’t tried making my own cake pops, but these tips are so easy to follow, I think I could handle it 🙂 Thanks for linking up with Merry Monday this week!
thehomesteadinghippy
July 6, 2016 at 7:41 AM
You make this look so easy! Thanks for linking up with Let’s Get real
Stepanie
March 9, 2016 at 4:05 PM
I plan on making these for a wedding reception. I need to drop off on Friday night but the reception isn’t until Saturday evening. Would they be fine sitting out in the open or refrigerate?
Danita
March 10, 2016 at 7:39 AM
Cake Pops are a great reception idea! They keep longer in the refrigerator so if you have room I’d probably do that. However, it’s only one day so if there’s not room they will be fine sitting out. Either way, just make sure they are covered well.
Thanks for stopping by. I’d love to hear how it goes.
Kelly
February 29, 2016 at 4:14 PM
I love the tutorial, you make this look real easy! This gives me courage to go ahead and try them for my daughters birthday. I was wondering if these can be made ahead of time then frozen. Could they be frozen with the coating or should I coat them after they thaw?
Danita
February 29, 2016 at 4:21 PM
Thanks Kelly! They really are pretty easy. Yes, they can be made ahead and frozen, but not with the coating. Just wrap them up good and tight so they won’t get dried out in the freezer. A couple of hours before you’re ready to coat, transfer them to the refrigerator. They’re too cold straight out of the freezer and the chocolate with crack as it cools. Hope they turn out well, I’d love to hear about it if you try them.
Leyda
May 16, 2017 at 6:34 PM
Can I make the cake balls one day and the next day put the sticks on
Danita
May 22, 2017 at 12:12 PM
Yes, absolutely. Just keep them in the refrigerator in the meantime. Great question and thanks for stopping by.
Amy
February 18, 2016 at 3:08 PM
If you need to make them faster and place them in the freezer, how long do you need to freeze them for?
Danita
February 18, 2016 at 3:42 PM
I would say only about 30 minutes. Just be careful they aren’t too cold or your chocolate will crack as it hardens. Thanks for stopping by!
Barbara
February 7, 2016 at 5:22 PM
Fun tutorial. I always wanted to see how that was done.. They’re so pretty.
Danita
February 7, 2016 at 7:23 PM
Thanks Barbara! Have a great week!
Jennifer
February 7, 2016 at 4:06 PM
I have a question about the coating. I am making cake pops and need to get the candy coating a very true bright white color. I typically use candy melts (for the white I normally use Wilton Bright White candy melts) but if I add white coloring the chocolate seizes. This is what happened in my “trial run” a few days ago and I am preparing for a birthday party on February 20th in two weeks. Any advice would be much appreciated. Because I always buy my candy melts in the color that I want to use I have never tried to color them before but I have to assume that the same problem would occur if I tried to color any melts with any coloring so I really need to find a way around it since I would bet money that there will be more instances when I need to alter the color somewhat. TIA!
Danita
February 7, 2016 at 7:22 PM
That’s a great question, Jennifer. I haven’t tried coloring the melt, just purchased in the color needed. I did a little research and it seems it’s the water in the regular food coloring that messes up the chocolate. From what I’ve read, Wilton makes a coloring specifically for their candy melts. They look like the paste colors but are made just for the candy melts. They may be in your local store (like Michaels) near the candy melts. I saw them online and they are called Wilton Candy Colors. The difference is, these are oil based so they won’t make the chocolate seize. Hope that helps and everything goes well with your party! Thanks so much for stopping by, I think I’ll add this info into the post! Have a great week!
Simply Save
February 7, 2016 at 12:01 PM
These look delicious! Thanks for being a fun cohost with me on the Small Victories Sunday Linkup!
Michelle
February 5, 2016 at 11:03 PM
Oh my gosh, I am so glad to see someone else dip their sticks twice so the sticks don’t discolor! It was a huge AHA moment for me, as I’m sure it was for you! Great post!
Danita
February 6, 2016 at 8:41 AM
Yes, it was. One of those….”why didn’t I think of that?!” moments. Thanks for stopping by, Michelle. Hope you have a wonderful weekend!
Allie
January 29, 2016 at 2:25 PM
What would you recommend doing with any leftover cake pops? Keep at room temp or keep in the refrigerator?
Danita
January 29, 2016 at 7:00 PM
Good question! And I had to stop and think about it. We don’t usually have very many left around here. While it isn’t necessary to keep them in the refrigerator, you can and it will help them stay fresh longer. Thanks so much for stopping by! Have a blessed weekend.
Jamie
January 21, 2016 at 9:33 PM
I’m a little confused by tip #7. Do we dry the stick after dipping it and then add the cake ball, or do we put the cake ball atop the candy coating before it dries?
Danita
January 22, 2016 at 8:50 AM
Sorry for the confusion Jamie.
The stick gets dipped twice. The first time, in #7, is to seal the end of the stick. This keeps the oils from the cake pop from seeping into the stick and dicoloring it above the pop. What you want to do is dip about 3/4 of an inch of the tip of your stick into your coating. Put the sticks into a holder to allow them to dry about 10 minutes. Once you’ve done that, dip one stick at a time back into the coating then immediately into the cake pop.
Hope that clears it up.
Thanks for stopping by….hope you this helps you make some tasty and beautiful cake pops!
Donna
January 12, 2016 at 10:23 AM
I love the step by step directions with pictures! Thank you for that! Quick question; Can I use homemade frosting? I try not to
buy the canned stuff. And if so, do you have a recipe for one that you think would work well? Thanks again!
Danita
January 13, 2016 at 3:45 PM
I think homemade frosting should work just fine. I do have a couple of recipes….Cream Cheese Frosting! and Chocolate Frosting
Thanks for stopping by and for the kind words. I’d love to hear how it turns out with homemade frosting, if you try it.
RaShell @ Mommy’s Apron
July 13, 2015 at 12:11 PM
Great tips! Thank you O Taste and See and Rosebud Bakery!
Comments are closed.