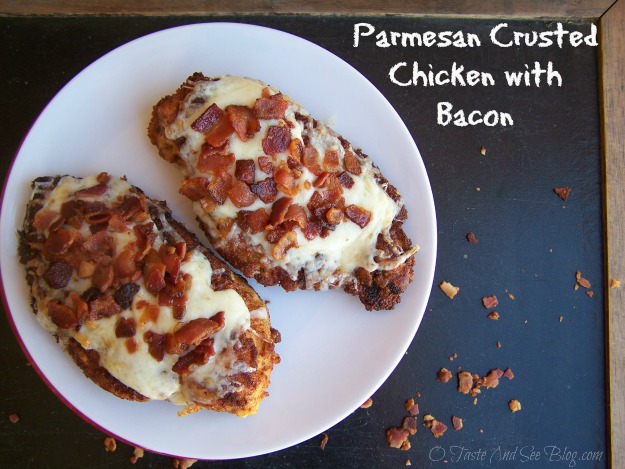
Parmesan Crusted Chicken with Bacon
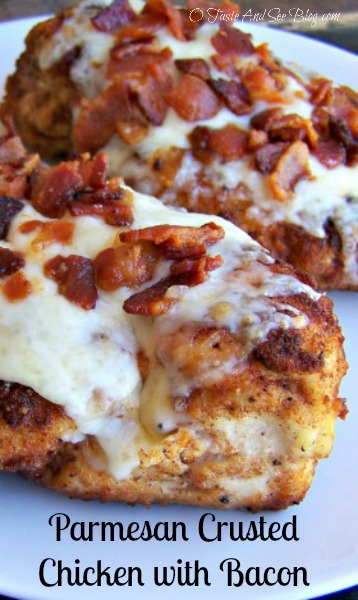
It’s a great day for Parmesan Crusted Chicken with Bacon!

You’ve come to the most viewed, most pinned, most downloaded recipe here at O Taste and See!
Thanks for visiting, pull up a chair and have a look around.
This recipe epitomized my new motto for dinner….
“When in doubt, smother with cheese and bacon!”
There’s really not much to say about Parmesan Crusted Chicken with Bacon except….YUM!
Here’s the Recipe:
Printable version below
- 1/2 tsp salt
- 1-1 1/2 cups shredded Asiago cheese – for melting on top
- 3-4 slices bacon – cooked and crumbled (can leave slightly under-done, it will finish cooking under broiler)
- 1 egg beaten
- 1 tablespoon water
- Oil for frying – about 1/2 – 3/4 cup depending on size of skillet
- 4 boneless skinless chicken breasts – about 4-5 oz each
- 1 cup grated Parmesan cheese
- 1/4 tsp garlic powder
- 1/4 tsp pepper
Preheat oven to 350 degrees
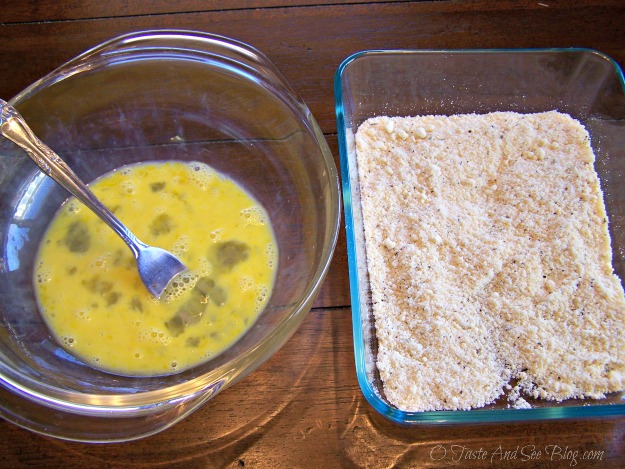
In a small shallow bowl, mix egg and water
In another shallow bowl, mix Parmesan cheese, pepper, salt and garlic
Heat oil over medium-high heat
Dip each chicken breast first in egg mixture then in cheese
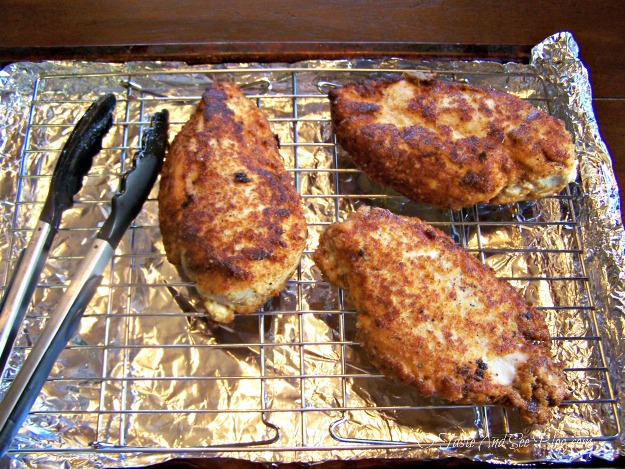
*Note: If oil isn’t hot enough your crust may stick to the bottom of the pan and you’ll lose it all*
Fry in hot oil until crust is golden brown
Prepare a baking pan by covering with foil and placing wire rack on top
Place chicken on rack and bake about 20 minutes or until juices run clear
Time will depend on thickness of chicken
Remove from oven and turn oven to broil
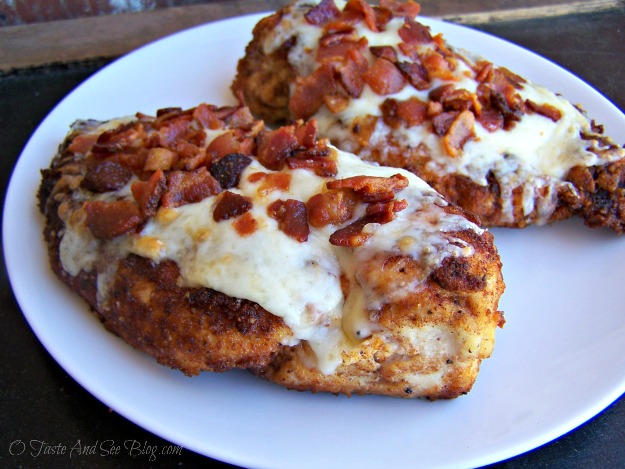
Top each piece of chicken with Asiago cheese and bacon and place under broiler to melt cheese
Update: Over the past few months the most frequently asked question has been, “Can I bake it instead of frying?” I haven’t done that myself so I don’t know how crispy the crust turns out. I have had a few comments from those who have tried baking and said it was great. I’d love to hear about any adjustments you make and how it turns out.
Let’s Stay In Touch!
Pinterest/ Instagram/ Facebook/ Twitter
Many have asked about the carbs and calorie count of this dish. Another recipe site featuring this recipe calculated them and I’m passing along the information. Again, I did not calculate these number.
- Calories………….413
- Carbs…………….. 0.9
- Fat………………… 22.7
- Protein ………….. 48.7
Other Popular Posts:
Sausage Balls
Seasonal Favorites:
Frozen Cranberry Salad Glazed Carrots


Southern Fried Apples Caramel Apple Cider



Sweet Potato Casserole Spoon Rolls
Dessert:


SNICKERS Mini Cheesecakes Chocolate Chip Cookie Pie
Pecan Pie Old Fashion Apple Pie


Deliciously Diabetic German Chocolate Cake Oreo Cookie Ball Place Card Holders


- Oil for frying - about 1/2 - 3/4 cup
- 4 boneless skinless chicken breasts - about 4-5 oz each
- 3/4 cup Parmesan cheese
- 1/4 tsp garlic powder
- 1/4 tsp pepper
- 1/2 tsp salt
- 1-1 1/2 cups shredded Asiago cheese
- 3-4 slices bacon - cooked and crumbed (can leave slightly under-done, it will finish cooking under broiler)
- 1 egg beaten
- 1 tablespoon water
- Preheat oven to 350 degrees
- In a small shallow bowl, mix egg and water
- In another shallow bowl, mix Parmesan cheese, pepper salt and garlic
- Heat oil over medium high heat
- Dip each chicken breast first in egg mixture then in cheese
- Fry in hot oil until crust is golden brown
- Prepare a baking pan by covering with foil and placing wire rack on top
- Place chicken on rack and bake about 20 minutes or until juices run clear
- Time will depend on thickness of chicken
- Remove from oven and turn oven to broil
- Top each piece of chicken with Asiago cheese and bacon and place under broiler to melt cheese
- Cook time will vary depending on thickness of chicken. To shorten time, pound chicken thin and fry until done, without baking.
*This post may contain affiliate links
This post is linked up at Over the Moon linkup party.





204 Comments
Rose Martine
November 6, 2020 at 10:48 PM
I so enjoy your site and your recipes. Would you please consider adding a print option so we can enjoy your recipes a little more easily. Thank you.
Danita
November 16, 2020 at 9:01 AM
There should be a print option. I totally get it… I always print recipes instead of reading them on my device.
Ashley
August 16, 2020 at 5:32 PM
I added the mayo like someone else suggested and my husband and I loved it! Such a great keto friendly recipe full of flavor! I also used the air fryer for 8 minutes on each side instead of frying in oil and that made it fried enough for us, absolutely delicious!
Chris@TTL
August 12, 2020 at 12:08 AM
Hum… a rare time I have to consider strongly our vegetarian stance. 😉
A friend made this recipe recently, and I most say, they loved and it smelled amazing. I had a taste of some of the fixing and made a fake meat variant that really worked out pretty well.
Thanks!
Raghuram
June 11, 2020 at 8:05 AM
This looks so good!! Could you do this without a wire rack?
Danita
July 22, 2020 at 3:07 PM
Yes. It would be just fine without
Irish
January 1, 2018 at 7:42 PM
Thank you for sharing this recipe! It was absolutely delicious!!! We all 4 agreed to add it to our regular rotation of meals.
Only change I made was to add some mayo after I cooked the parmesan chicken and then add the asiago. I needed more fat to meet my macros but mayo is a delicious addition to chicken! I also added the bacon after I let the asiago melt/brown because it tends to burn quickly.
I also used my pressure cooker to cook the chicken, fried the chicken in the air fryer, and broiled in the oven.
Danita
January 9, 2018 at 6:34 PM
Sounds delicious with your changes! So glad your family enjoyed it! Thanks for stopping by.
Tammy Pipe
November 28, 2018 at 1:18 AM
I was just thinking this would work great in the air fryer. I’m trying in next week’s meal plan.
Danita
December 1, 2018 at 8:32 AM
I would love to know how it turns out! I’ve wanted an air fryer for a while.
Dana Jenkins
February 26, 2019 at 7:03 PM
I I just made this in my Air Fryer tonight. Didn’t use any of the oil! It turned out delicious!
Kayla Dale
February 13, 2022 at 9:23 AM
At what temp and for how long did you cook in your air fryer?
Danita
May 22, 2022 at 7:20 AM
Good question! Unfortunately, I’m still in the learning curve with my air fryer. I haven’t had the time to really experiment with it enough to know. I’d love to have you come back and update here if you are successful with it!
Danita
June 18, 2024 at 2:10 PM
Good Question! I’m sorry I don’t have the answer to that one. I’m still trying to get around the learning curve on using my air fryer.
lolly jane
August 24, 2017 at 8:44 PM
Thanks so much! I followed the recipe except added mozz. cheese and it was superb! Side of buttered quinoa rice and the whole fam loved it, thank you!
Danita
August 24, 2017 at 8:57 PM
YEAH!!! Thanks for letting me know. So glad y’all enjoyed it! One of my favorite things about this recipe is you can use just about any cheese and it’s DE-LICIOUS! Thanks so much for taking time to let me know how it was. Have a blessed day.
techlazy.com
April 15, 2017 at 2:10 AM
I tasked the hubby with throwing this in the crockpot the other day for dinner. It turned out so good! I wouldn’t change a thing. I also shared it on my blog today — linking back to you of course 🙂 Thanks for sharing!!
Beverly
March 6, 2018 at 12:22 PM
could you tell me how you did it in the crockpot please?
Danita
March 6, 2018 at 2:44 PM
Hi Beverly,
This is a delicious recipe but unfortunately, this one can’t be done in the crock pot. However, it is very quick and easy and is ready in about 30 minutes, depending on how thick your chicken is.
I do have some great crock pot recipes, just type in “crockpot” in the search bar and they should all come up.
Thanks for stopping by!
Sabrina B.
March 8, 2017 at 3:05 PM
I’m in! Was searching for chicken recipes since chicken definitely needs a lot a of new recipes to keep in interesting and found this! Thank you for the perfect inspiration for my next dinner! Love how this had asiago AND parmesan, and then there’s the bacon!
Susan
December 7, 2016 at 3:00 PM
I tried this recipe tonight. It’s awesome. I made a few substitutions. I add just a handful of italian bread crumbs and used Mozzarella cheese instead of asiago. Thanks for the idea!!
Danita
December 8, 2016 at 6:56 PM
So glad you enjoyed it Susan. Yes, that’s one of the things I love about this recipe, just about any cheese or coating works well. Thanks so much for stopping by and taking the time to let me know you enjoyed it. Have a very Merry Christmas!
Brooke
October 28, 2016 at 11:48 AM
Hi!!! This looks delicious! So for the carbs and everything, is that the nutritional value for one chicken or for a whole recipe? Thank you!
Danita
November 1, 2016 at 10:57 AM
Good question, Brooke. That is for each serving. Thanks for stopping by, I hope you’ll come back and check out some more recipes.
Jennifer
February 7, 2017 at 2:30 PM
Each serving is 1 breast?
Danita
February 8, 2017 at 8:19 AM
Yes, that’s usually what I plan. Sometimes I will do less, depending on the size of the chicken or if there are children. Thanks for stopping by Jennifer. Have a blessed week.
Becca Vann
March 16, 2017 at 10:40 AM
What do you typically serve this with so that it stays keto friendly?
Danita
March 16, 2017 at 8:51 PM
Hi Becca,
I’m not really familiar with the keto diet but I will say asparagus, salad or green beans would go nicely with this chicken. Roasting a combination of veggies in the oven is always a good option, as well.
Thanks for stopping by. Hope that helps a little.
melindatodd
July 29, 2016 at 7:16 PM
The top instructions say to heat the oil on high. I knew better and yet followed the instructions. I hope our dinner turns out. Much further down the page and past a ton of other recipe images, I see instructions that say medium high heat. I’d fix the top so folks like myself don’t ruin their food, most of us don’t scroll that far down to read a second set of instructions. Sigh
Kay Z
February 28, 2020 at 5:00 AM
ALWAYS, ALWAYS read your recipe 2 or 3 times before you make it. This comes from a sous chef and part time cooking school instructor. If reading on the internet, ALWAYS read the comments before trying the recipe. This will make you a great cook. You need to be prepared! Good luck!
Danita
March 14, 2020 at 10:06 AM
I couldn’t agree more, Kay
Lady D.
July 5, 2016 at 9:27 PM
I made this tonight for my husband. I didn’t have Asiago cheese so I used extra sharp white cheddar. OMG. It was delicious. My hubby loved it. Said he would buy it out. This is a keeper. Thanks.
Danita
July 6, 2016 at 7:34 AM
So glad you enjoyed it! Yes, I’ve had many people tell me they used a different cheese and it was still delicious. I love a good “flexible” recipe. Thanks for stopping by and taking the time to leave a comment. Have a blessed day!
marilyn1998
June 30, 2016 at 7:36 PM
Thank you so much for linking at #overthemoon! I look forward to seeing what you share every week. Please come back for #WonderfulWednesday or #ThursdayFavoriteThings. Don’t forget to comment your link #’s so I can be sure to visit and you get a chance to be featured! Pinned and shared.
Kathy
May 31, 2016 at 1:39 PM
Have made this twice and OMG it is amazing good.
Danita
June 1, 2016 at 6:56 AM
Thanks Kathy! So glad you like it. I appreciate you taking time to stop by and let me know. Have a blessed week!
Hanna
April 15, 2016 at 11:10 AM
Made this two nights ago exactly as instructed and it was delicious! My boyfriend and I are on low carb diets and this recipe is a fantastic addition to that meal plan. I made a short post in my blog but didn’t add recipe details, I just posted this link to it. Thank you for sharing a great recipe!
Danita
April 16, 2016 at 5:42 PM
So glad you enjoyed it, Hanna. Thanks so much for sharing it on your blog! Have a blessed week!
Young Cook
April 14, 2016 at 1:45 PM
How long would I bake f it was in the oven rather than ring fried?
Danita
April 14, 2016 at 1:52 PM
It will depend on the size and thickness of your chicken but I would say about 30 minutes. If they are small and thin, check after about 20. If they are extra large it will take a while, I’d recommend cutting them in half before you start. If you give it a try I’d love to hear how they turned out and how long they took. Thanks so much for stopping by and have a great week!
Charles Sirbaugh
April 13, 2016 at 5:50 PM
Made this today and it was delicious,did it all in the oven.
Danita
April 14, 2016 at 7:55 AM
Thanks Charles for trying the recipe and for taking the time to come by and let me know! So glad you enjoyed it. Lots of people ask about doing it in the oven, good to know it works. Haved a blessed day!
Vicki
March 26, 2016 at 12:04 PM
This was FANTASTIC. thanks for sharing
Amber
March 14, 2016 at 9:15 PM
I couldn’t find any Asiago cheese, but I used Mozzarella and it was delicious!
Danita
March 15, 2016 at 12:00 PM
I love it! That’s exactly how this recipe was “born”. I didn’t have many of the things I needed for a recipe I wanted to make so this is what I came up with. Glad you enjoyed it! Thanks for stopping by to let me know. I love hearing a recipe turned out well for someone else.
Amber
February 1, 2016 at 2:47 PM
Dinner tonight! This looks amazing I can’t wait for my hubby to taste it! Thanks
Danita
February 2, 2016 at 6:58 AM
Thanks Amber! I’d love to hear how he likes it. Have a blessed week.
Samone
January 26, 2016 at 9:17 AM
This was delicious and easy to make. I think this will be apart of my cookbook.
Chana
January 22, 2016 at 4:02 PM
Can I just use a regular baking dish? I don’t have a rack or anything.
Danita
January 22, 2016 at 8:06 PM
Yes, a regular pan will work just fine. I’ve had some people say they used a glass 9×13 others a metal pan. I do recommend lining the metal pans with foil, just for easier clean up.
Thanks so much for stopping by!
The Mad Mommy
January 10, 2016 at 4:11 PM
I have seen this recipe before and it always looks so amazing! Thank you for sharing it and for co-hosting the #SmallVictoriesSundayLinkup with me!
helenfern
January 10, 2016 at 10:26 AM
This looks deliciously simple!!
I found you on Small Victories Sunday Linky – would love to have you share on What’s for Dinner
http://www.lazygastronome.com/whats-for-dinner-sunday-linky-26/
Mother of 3
January 10, 2016 at 7:05 AM
This sounds (and looks) amazing! I can’t wait to try it!
Leila
December 11, 2015 at 12:09 AM
i made this last night just as instructed and it turned out beautifully and enjoyed by all! thanks so much!
Danita
December 11, 2015 at 6:57 AM
Thank you so much Leila for taking time to let me know! It’s always encouraging to hear my instructions are clear and work for other people. So glad you enjoyed it! Have a blessed day and a very Merry Christmas.
Katee
December 10, 2015 at 4:12 PM
Could I use frozen chicken??
Danita
December 10, 2015 at 6:18 PM
I’m not sure what you mean by “frozen” chicken? If you mean boneless skinless breasts you bought and froze, yes. Of course, you need to thaw them first. Most of the chicken we eat has been frozen then brought out to use when we need it. If you mean pre-cooked and then frozen I’m not sure that would work well. Since it’s already cooked you could just add the topping and broil. That would be yummy. Hope that answers you’re question. Feel free to email or reply if it doesn’t. Thanks for stopping by!
Angel
December 8, 2015 at 4:59 AM
Would it turn out any different using a deep fryer and how long would i have to fry it for? Thanks!
Danita
December 8, 2015 at 7:04 AM
Good question. As much as I love a good deep fried chicken (or anything else) I haven’t tried it with this one. I don’t see why it wouldn’t work. My only concern would be the Parmesan cheese getting too brown. I’m not sure it would hold up to the deep frying and well as flour but without it the dish is totally different.
As far as frying time, that would depend on the thickness of your chicken. If I were going to try it, I’d probably pound the chicken to thin it out, that way it would take less time and avoid the risk of burning the cheese coating. Generally, when frying the rule of thumb is they’re done when they start to float. For me it’s often a little trial and error…meaning I fry until it floats and looks golden brown, take the thickest piece out, cut into the center and check it. I’d say it should’t take more than about 5 minutes per piece.
If you decide to try it, I’d love to know how it turns out.
Thanks so much for stopping by. Have a blessed day!
Dee
November 23, 2015 at 2:13 PM
This turned out WONDERFULLY cooked entirely in the oven!! Things I will do differently next time: 1.) flatten the pieces before cooking – it took about 20 min. longer because of the thick end; 2.) Not bother with a rack in the bottom of the pan – I used a 13×9 glass cake “pan”, without foil. (Cleanup was easy.) The top & sides are plenty crunchy enough, esp with the bacon, and that way I won’t lose any of the sprinkled topping to the underneath.There was hardly any grease. 3.) Pan-fry the meat for a few minutes first. I misunderstood the directions & thought it meant Deep frying, and I thought that sounded weird. 🙂
Danita
November 23, 2015 at 2:27 PM
YEAH! So glad to hear it turned out well! Thanks for the hints for next time. Pounding the chicken is a great idea, especially if it’s thick. I didn’t think about using a glass pan, great idea, that probalby would make for very easy clean up. Thanks so much for taking time to stop by and share a comment. Happy Thanksgiving!
Lynne
November 13, 2015 at 7:15 AM
Good morning! I made this again last night and it’s just wonderful! I am a big fan of fresh Parmesan so I used that instead of the stuff in the can. As you stated earlier, it doesn’t work as well. It was still really good, but it did make the pan more difficult to clean. Lesson learned! I didn’t have Asiago cheese so I used Mozzarella with a sprinkle of pepper Jack cheese on top with the bacon and it sure was yummy; the pepper Jack gave it a nice little zing. This is a restaurant worthy recipe!
Danita
November 13, 2015 at 8:00 AM
Aww, you’re so sweet! You are right about this being a versatile recipe. I’ve used other cheese and it’s still great. I made this for a banquet for 150 people and used an Italian blend. It was wonderful. Also, right about the clean-up. Thanks so much for stopping by and letting me know. Have a blessed weekend.
Anitria Mosley
November 9, 2015 at 3:46 PM
Hi Danita, did you use a deep fryer or just a regular skillet to fry the chicken breasts in?
Danita
November 10, 2015 at 6:07 AM
Anitria,
I just used a regular skillet. You can cook them completely in the skillet but I just cooked them enough to get a nice crispy golden crust then into the oven to finish up. Thanks for stopping by! Have a blessed week.
Veronica
November 4, 2015 at 4:16 PM
Is the rack a necessity? Saw this and want to try it but that’s the one thing I don’t have!
Danita
November 4, 2015 at 4:20 PM
Hi Veroncia,
The rack just allows any oil to drip away from the chicken but it can be done without it. I would still cover the pan with foil for easier clean up. Without the rack the bottom of the chicken may be a little less crispy but still taste great. I’d love to hear how it turns out. Thanks for stopping by!
Odis
November 4, 2015 at 12:58 PM
Hello do you use fresh grated parmesan cheese or the dry kind?
Danita
November 4, 2015 at 4:02 PM
Hi Odis,
Thanks for stopping by. I use the dry kind. You know, in the can usually Kraft or some other big brand. Our kids call it “sprinkle cheese” because we usually sprinkle it on our spaghetti or pizza. I love freshly grated Parmesan but it doesn’t work for this recipe. It would burn and make a big mess.
wendy
March 24, 2017 at 9:17 AM
this was my question as well, glad i could scroll down and read these messages. good to know it’s the dry kind!
Sista m
September 25, 2015 at 6:49 PM
Making this for siner as we speak! Its in the oven right now, can’t way to try it!
Danita
September 26, 2015 at 3:15 PM
I’d love to hear how it turned out!
kenny fogle
September 1, 2015 at 3:29 PM
is there a cookbook with all this in it I can purchase somewhere?
Danita
September 1, 2015 at 4:20 PM
Kenny,
I am very flattered that you asked but I’m afraid not at this time. My recipes are just found here on my blog for now. I’ll keep you posted if I decide to do one.
Whitney
August 24, 2015 at 12:48 PM
Amazing recipe! I read over it as a base then changed it to what I had in the pantry and it was divine! I added more salt to the parmesan mixture and a quarter cup of bread crumbs. Instead of using egg and water I made a flour milk mixture. I set the over at 380 instead and used a stronger spanish cured cheese for the top. Absolutely amazing! I’ll definitely be making it again. The chicken was moist and the meal was very flavorful! Thanks!
Danita
August 29, 2015 at 10:08 AM
Thanks Whitney! I love using what I have in the pantry to create something new. Your spin on this recipe sounds amazing. Thanks for sharing! Have a blessed weekend.
JoAnne
August 22, 2015 at 11:29 AM
Approximate frying time using 350 degree oil? I realize it will depend on size of chicken breasts. I have never fried chicken but really want to try1 Thanks
Danita
August 23, 2015 at 2:53 PM
JoAnne,
The total cooking time is about 30 minutes, depending on size and thickness of chicken. Frying the chicken a little on both sides to brown the crust and seal it to the chicken (browning) should take about 5 minutes, then about 20 for baking until done. Put the cheese and chicken on top and under the broiler for only a minute or two until cheese is melted. You can completely fry the chicken but baking after browning keeps it from absorbing more oil. I’ve never done it but several people have commented that they have skipped the frying altogether and just baked and it turned out great. If you aren’t comfortable with frying just try it that way. I’d love to hear how it turns out. Thanks for stopping by.
Beth
August 19, 2015 at 5:34 PM
I tried it with boneless pork chops!! So good
Danita
August 20, 2015 at 7:43 AM
What a great idea, Beth! I’ve never thought about using pork but it doesn sound great. Glad you enjoyed it and thanks for taking the time to let me know. Have a blessed day.
Cat
July 23, 2015 at 10:05 PM
Thank you so much for sharing!! Made this for my wife tonight and she devoured it!!
DonnaG
July 21, 2015 at 6:25 PM
I just made this for dinner tonight. Hubby and I loved it. I followed the directions exactly. We have enough for leftovers tomorrow night. Hooray for not cooking in 95 degree heat!
Danita
July 22, 2015 at 8:06 AM
You’re so right about not cooking in the heat! Thanks Donna for stopping by to let me know you enjoyed my recipe. So happy to hear it turned out well! Have a blessed week.
Stephanie
July 19, 2015 at 7:21 PM
Made this for an extended family get-together today and absolutely loved it!! We marinated our chicken in Olive Garden Italian Dressing overnight for extra flavoring. We still brushed the egg mixture over the chicken before coating each with the Parmesan mixture during the preparation. Will definitely make this dish again!
Danita
July 19, 2015 at 7:25 PM
Great idea with the Olive Garden dressing! It’s one of our favorites, I’ll have to try that next time. So glad you enjoyed it! Thanks so much for stopping by to let me know. Have a great week!
Jasmina
July 14, 2015 at 8:31 PM
I want to tell you that this was by far the best recipe I have made. I followed the instructions to a t. My family raved how delicious this meal was. I definitely recommend. Two thumbs up!
Danita
July 15, 2015 at 9:22 AM
Thank you SOOOO much Jasmina! I appreciate your kind words and that you took the time to come back and let me know. Have a blessed week
Rebecca
July 13, 2015 at 5:44 PM
How many servings does it make?
Danita
July 13, 2015 at 10:00 PM
Rebecca, it depends on the size of your chicken breasts. If they are an average size (5-6 oz) I’d say 4 adults. The recipe is easily adjusted if you need more or less or if you have some adults and some children. Thanks so much for stopping by!
Angie | Big Bear’s Wife
July 5, 2015 at 7:36 PM
Love your dinner motto haha!
Jodie
July 3, 2015 at 12:07 PM
If just baking the chicken, how long will it need to stay in the oven?
Danita
July 3, 2015 at 4:54 PM
It depends on the thickness of your chicken but as a general rule I’d say 20-30 minutes.
Suzanne
July 1, 2015 at 7:11 PM
We just finished this tonight and it was delicious. I did add 1/4 cup gluten free baking mix because I didn’t have enough parmesan cheese. I baked it and flipped the chicken halfway through. Topping it with cheese and bacon made it sublime. Served it with a fresh spinach salad and corn on the cob. OMG, it was juicy, tasty and we will have it again and again. Thanks for making my wheat allergy just a little easier.
Danita
July 1, 2015 at 8:40 PM
Oh, Suzanne so glad to hear you enjoyed it! We have friends that are also allergic to wheat and I understand a little about how difficult it is to eat wheat-free. It is nice to be able to have something yummy! Thanks for stopping by and the encouraging words.
vickie
June 27, 2015 at 10:06 AM
How many carbs?
Danita
June 27, 2015 at 10:49 AM
Good question Vickie. I haven’t calculated them myself, but another recipe site that featured this recipes says .9
I’m assuming that to be accurate as none of the ingredients really contain carbs.
tracydowling1
June 22, 2015 at 12:17 PM
Can it be baked entirely?
Danita
June 22, 2015 at 1:43 PM
Yes Tracy, it can be baked without frying first. I haven’t done it myself so I’m not sure if the crust is quite as crispy. I have had others say they omitted the frying and it was delicious. Thanks for stopping by!
patricia
June 15, 2015 at 11:35 PM
MAre this for dinner, very easy and delicious. ThAnd you!
Danita
June 16, 2015 at 9:31 AM
Glad you enjoyed it! Thanks so much for taking time to let me know. Stop by anytime!
Michele
June 7, 2015 at 8:15 PM
I noticed that you didn’t say what degree to heat the oven for baking the chicken. I’m assuming 350? I did not sift through the comments to see if anyone else asked this question.
Danita
June 8, 2015 at 9:53 AM
Yes it is 350. Sorry it’s not easy to find. I’m putting it in bold for future viewers. Thanks!
Amanda
May 31, 2015 at 7:25 PM
Ohmygod this Recipe is to die for! I followed the recipe exact (except for substituting Colby jack for asaigo, only because I couldn’t find it at the grocery store). Anyways, the chicken took exacltly 20 minuites to cook after frying and it was perfectly juicy and still crunchy. I thought the parsmean coating was a little strong by itself but paired with a pile of spaghetti and its just the right amount. Love it, love it, love it!
Danita
May 31, 2015 at 10:17 PM
Thanks Amanda! It’s always exciting to hear from someone who loved my recipe and that it turned out great. Great idea with spaghetti and it’s perfect with just about any cheese on top. Thanks so much for stopping by to let me know. Have a great week.
Ashley
May 24, 2015 at 9:16 PM
LOVED this recipe! We baked the chicken I stead at 350 degrees for under 30 minutes! We also didn’t have Asiago cheese at the store so we tried Muenster cheese instead and LOVED it! Thank you for the great recipe!
Danita
May 25, 2015 at 8:13 AM
Ashley,
So glad you liked it! Love your variations. That’s one of the things I love about this recipe….use what you have and it still works! Thanks for stopping by to let me know you enjoyed it. Have a blessed Memorial Day!
Kasia
May 13, 2015 at 5:11 PM
Great recipe yummy and easy to follow. I wonder if there is any lacto-free substitute for Parmesan as I need some inspiration for surprise dinner but my other half is lactoze intolerant.
Danita
May 14, 2015 at 7:14 AM
Kasia, I’m not sure about that. Although it would be different, you could use bread crumbs and omit the cheese on tip and just use bacon. If I come across anything else I’ll keep you posted. Thanks for stopping by!
Candyski
May 11, 2015 at 7:45 PM
We just finished dinner and this got rave reviews from the whole family! The only change I made was I used mozzerella and shredded parmesan in place of the asiago since I did not have any.Since I’m doing low carb this is a great way to have fried chicken without the carbs.
Danita
May 12, 2015 at 7:31 AM
So glad to hear! Thanks for stopping by, it’s always a great encouragement to hear someone liked my recipe. I love this chicken because it’s versatile. Whatever cheese you happen to have works great! Thanks again.
Fred
May 6, 2015 at 6:38 PM
I’m wondering, what would happen if you dredged the chicken in flour, before putting it in the egg, then parm cheese ? I just bought a couple Flip Pans from. Evine. TV. I’ll try it in them, I am going to try the flour first, I’ll let you know. Fred
Danita
May 7, 2015 at 7:14 AM
I’d love to hear how it turns out! It will probably be good. Thanks for stopping by Fred.
Arti ~
May 2, 2015 at 4:52 PM
Great recipe. It had flavor in every bite with that Parmesan cheese!… We tried this today and used Monterey jack cheese, added some cayenne pepper in the coating, and put a few jalapenos on top before broiling….Only because we like to kick things up a notch….Recipe is a saver! Thanks!
Danita
May 3, 2015 at 7:16 AM
Sounds delicious! Love the additions. Thanks for taking the time to let me know. So glad you enjoyed it.
Angie mclemore
April 26, 2015 at 3:56 PM
I used Swiss cheese and bacon bits. It was delicious.
Danita
April 26, 2015 at 4:58 PM
That does sound good Angie! Thanks for taking time to stop by and let me know. Have a great week.
Sue
April 23, 2015 at 11:50 AM
This looks so good! Just wondering if you use the Parmesan in a can, or freshly grated. I will definitely be trying this recipe.
Danita
April 23, 2015 at 2:04 PM
I use the Parmesan in the can for the breading. When I didn’t have Asiago I have used freshly grated Italian 4 cheese blend or even Mozzarella for the topping. Thanks for stopping by, hope you enjoy it!
Jay Eatz
April 22, 2015 at 5:01 PM
“when in doubt smother it in bacon” great call
Sinea Pies (Ducks ‘n a Row)
April 22, 2015 at 8:45 AM
I love parmesan crusted chicken but THIS recipe is over-the-top! Pinned (among the zillion other pinners out there – what a popular post this one is!) Hey, come by and share it on today’s party on Ducks ‘n a Row? Please do ♥
Danita
April 22, 2015 at 3:43 PM
Thanks Sinea for the invite! Headed over now.
Kacey W.
April 13, 2015 at 7:07 PM
This was a tasty dinner, but it took a while. In the future I think I’d use thin sliced chicken breasts, cook them completely in the pan (cook bacon in the meantime) and then broil. The bacon and cheeses were a yummy combo!
Alex
March 24, 2015 at 5:47 PM
is it possible that you could bake it instead of fry it?
Danita
March 24, 2015 at 7:42 PM
Yes, I have had several people ask and some have commented that they did bake it. I haven’t done it myself so I’m not sure how crispy the crust come out but others have said it worked great and they loved it. Thanks Alex for stopping by! Enjoy and I’d love to hear how it turns out if you try it.
Amanda
March 17, 2015 at 9:51 PM
So good!
I made this for my husband he totally loved it! I used cheddar and mozzarella on top!
Danita
March 18, 2015 at 6:51 AM
So glad to hear! I love the versatility of this recipe. Thanks Amanda for stopping by to let me know. Have a blessed day!
Jeff Davis
March 16, 2015 at 4:25 PM
I love chicken…but I was wondering if you thought this might be fattening?
Danita
March 16, 2015 at 9:44 PM
Jeff, I try NOT to think about it. LOL! It is gluten-free and low-carb but not likely to be low fat with all the yummy cheese. Thanks for stopping by.
Kim W.
February 22, 2015 at 7:32 PM
Danita! Thank you so much for sharing this recipe. I made this dish tonight & let me tell you my family was VERY impressed. I tweaked a few things… I used 12 thin cut chicken breast, 1 cup Parmesan cheese w/ 1/2 cup Italian bread crumbs. To ensure the crust would stay on I used my deep fryer. Using a deep fryer allowed me to control temp for the oil. I also used three cheesees with the bacon topping… Blue cheese, chaddar cheese & mozzarella. My family of 5 prefers different cheeses so I topped them each with the cheese they like. This dish quick, crusty, juicy and “restaurant quality” as my hubby stated. This will definitely be in our dinner rotation.
Danita
February 23, 2015 at 7:50 AM
Thanks Kim! I love hearing from people who have tried my recipes. Great ideas for making this one your own. I know what you mean about the deep fryer, I use mine most of the time when I fry. Your family of 5 sounds a lot like my family of 5…we like the same things with just a little twist. Recipes that allow me to make one dish and tweak it to fit each person’s prefers are the best. So glad you all enjoyed the chicken. Thanks again for stopping by and for your kind words. Have a blessed week.
Jill Walton Pelak
March 16, 2015 at 4:19 PM
This looks amazing! However, it might be helpful to add that it’s going to take at least 45 minutes from prep, to cooking. I am trying to make this dish as we speak, and won’t get to eat it hot ( nor will one of my kids) as my daughter has gymnastics we will be leaving for. look forward to eating it when I can sit down lol.
Danita
March 16, 2015 at 9:45 PM
Thanks Jill. I appreciate your feedback and will add that note. Sorry you didn’t get to try it right away. Hope it was still good. Thanks for taking time to leave a comment.
Fayth
February 18, 2015 at 7:39 PM
I’m curious about how hot the oil is supposed to be. All my cheese stayed in the pan. Not very good
Danita
February 19, 2015 at 4:21 AM
Sometimes it is difficult to know about the oil. I usually allow the oil to heat on high for a couple of minutes then test by dropping a pinch of the Parmesan cheese I’m using for breading into the oil. If it sizzles, it’s ready for frying. Sorry about your crust. I know it’s frustrating. Thanks for stopping by and I hope you’ll try this recipe again.
Heidi
February 18, 2015 at 11:09 AM
Delicious! ! My family of 5 all loved it which is rare! I did use mozzarella on top since I didn’t have asiago.
Danita
February 18, 2015 at 2:41 PM
Yeah! So glad you loved it! Thanks for stopping by to let me know.
Teri
February 18, 2015 at 8:24 AM
I wonder what dipping the chicken into mayo. first and then the cheese mixture would taste like.
Danita
February 18, 2015 at 10:02 AM
I’m not sure Teri. I’d love to hear how it turns out if you try it. I know I’m very odd but I can’t do mayo…seriously, even the smell makes me gag a little. Crazy, but true. Most people would probably love your idea.
Stacey
February 21, 2015 at 8:31 AM
I make a similiar recipe, but I marinate the chicken in Ceasar dressing & then dip in cheese & bread crumbs. It’s really good!
Shannon @ Dinner from the Heart
February 17, 2015 at 5:51 PM
I sent this to my 18 yr old on via Pinterest and he said we need to make it – so make it we are – tonight! I love that the parmesan and egg make such a great crust. I’ll let you know how it goes. Shannon 🙂
Danita
February 17, 2015 at 8:13 PM
Thanks Shannon! I can’t wait to here how you like it!
Margie
April 3, 2015 at 10:33 AM
Hi Shannon,
Can I ask how you sent this through Pinterest? I would love to do that to save this recipe with my others. Looks delicious. How did yours turn out? Please email me [email protected]
Jen
February 16, 2015 at 5:55 PM
I made this tonight, and it was delicious! My five year old even loved it! The chicken had lots of flavor and was very tender. I melted shredded parmesan on top because I didn’t have asiago and didn’t have a metal rack, and it was still great! Thanks for the great recipe! I will definitely be making it again.
Danita
February 16, 2015 at 7:05 PM
Yeah Jen! So glad to hear your family loved it. I recently made it for about 125 people and I didn’t have racks either. For cost sake I used an Italian 4 cheese blend and it was still wonderful. I love a good versatile recipe. Thanks so much for letting me know it went well. Food bloggers always love it when someone else has great success with one of their recipes.
Christina
February 16, 2015 at 8:44 AM
Do you have to put it on a wire rack ? I don’t have one.
Danita
February 16, 2015 at 12:03 PM
No Christina it doesn’t have to go on a wire rack. That just allow any extra fat to drip away but I have done it without and it’s perfectly fine. I would recommend covering the pan with foil then a little non stick spray so it doesn’t stick and loose all your crust….plus easy clean up! Thanks for stopping by. ENJOY!
Christina
February 16, 2015 at 2:37 PM
Thank you so much for your reply. Going to cook it tonight.
Meg
February 15, 2015 at 12:09 PM
Could you grill the chicken instead of frying?
Danita
February 15, 2015 at 4:58 PM
Hi Meg. Thanks for stopping by! Good question…I guess it depends on what you mean by grill. We usually grill on our outdoor grill and I wouldn’t recommend that. If I grill indoors I usually mean cooking meat on my griddle. I don’t know if that would work either. The crust really needs the hot oil to seal it to the chicken. I think without it the cheese would burn before the chicken got done. You could probably bake it without browning first, although I haven’t tried, and get a fairly good result. If you decide to try it I’d love to hear how it turns out. Have a blessed week.
Dan
February 14, 2015 at 5:25 PM
Can you bake this instead of frying it?
Danita
February 15, 2015 at 7:31 AM
Hi Dan. Yes, you could skip the frying part and just bake it. The crust may not be quite as crispy but it should still be OK. I’d recommend baking it directly on the baking sheet instead of a wire rack, using a little oil on the baking sheet and turning about half way through. This would be more like “oven frying”. If you just don’t want to use any oil I’d probably line the pan with foil and spray it with non stick cooking spray, just for an easier clean up. Thanks so much for stopping by and have a blessed weekend!
LaDonna
March 6, 2015 at 9:32 PM
I baked mine in a cast iron skillet. I pre-heated the skillet in the oven and then when it was hot I added the chicken. Half way through baking I turned it and the followed the rest if the directions. Was sooooo good!
Danita
March 6, 2015 at 10:41 PM
Great idea LaDonna! I love a good cast iron skillet! Thanks for stopping by to let me know and have a great weekend!
Paula
May 11, 2015 at 12:53 PM
LaDonna
How long did you bake for? and on what? Did you just prepare chicken first then bake when flipping you topped with the rest of toppings? Sorry not that great of a cook and know my husband would rather fry it but I liked baked better.
Thankyou
Karen
February 14, 2015 at 2:08 AM
When I try and pin this it only wants to save the image and not the recipie. Do you happen to know what I might me doing wrong? This recipie sounds awesome!
Danita
February 14, 2015 at 6:57 AM
Hi Karen. Don’t worry, you’re not doing anything wrong. The site is set up to only pin the image, otherwise anyone could get the recipe without visiting my blog. You are right, it is an awesome recipe. Thanks so much for stopping by and I apologize for any inconvenience. You might want to pin the image then when you get ready to try it print it off from the printable version at the bottom. Hope you have blessed weekend!
Cydnee
February 3, 2015 at 8:04 PM
Danita, your Parmesan Crusted Chicken looks delicious! Thank you for joining us at #purebloglove. We enjoy having you every Thursday at 8PM, EST through Sunday night. ~Cydnee
Krystal
January 26, 2015 at 7:27 PM
I made this for dinner tonight because the picture looked fabulous! & I am glad to say that it tastes just as fabulous as it looks. Thanks for sharing this recipe. Will definitely make again!!!!
Danita
January 27, 2015 at 7:08 AM
Thanks Krystal! I’m always excited to here about one of my recipe going well for others. I appreciate you taking time to let me know. Have a blessed day.
Melly
January 20, 2015 at 3:54 PM
I made this a while ago and it was AMAZING. I’m making it again tonight! Fantastic recipe!
Danita
January 20, 2015 at 10:50 PM
Thanks Melly! I’m getting ready to make this for 225 people in a couple of days and I’m a little nervous. It’s always encouraging to hear others enjoyed it.
Michele
January 16, 2015 at 4:55 PM
Might want to Update the description – instead of saying “cheese”, it would help to say parm cheese. I put all the cheese together not knowing and it was not good.
Danita
January 17, 2015 at 8:20 AM
Sorry about that Michele! Thanks for letting me know. I did update. Hope you’ll try again.
Kristen Thomas
January 8, 2015 at 7:37 PM
I made this tonight and it was a big hit! Was wondering though: Do you use grated Parmesan from a can/shaker? Or do you grate your own? I grated my own this time.
Danita
January 9, 2015 at 6:58 AM
I used the canned kind but I bet it would be amazing with freshly grated. Thanks Kristen for trying it and letting me know! Have a blessed weekend!
Nicole
January 7, 2015 at 2:45 PM
Hi Danita, thanks for this recipe! Do you have any idea of carb content? It seems like it would be ok on a low carb diet, but thought I would ask.
Thank you!
Danita
January 8, 2015 at 6:48 AM
Hi Nicole,
Good question, I hadn’t really thought about until you asked. You’re right, it does seem like it would be low carb. I checked the cheeses and 0 carbs there. None of the ingredients have carbs so unless frying somehow adds them it should be very low. Thanks for stopping by. Hope you enjoy!
Andrea
December 29, 2014 at 8:17 AM
Hi, this sounds delicious! do you dip the chicken in the parmesean and asiago or just parmesean and top with asiago?
Danita
December 29, 2014 at 11:21 AM
Hi Andrea,
I dip the chicken in the Parmesan to coat. When it’s done, I top with Asiago and broil to melt the cheese. Thanks for stopping by, hope you enjoy! I’d love to hear how it turns out. Happy New Year!
Debra
December 23, 2014 at 5:39 PM
I am making these for the first time tonight…I will let you know how they turn out..Thanks Danita for sharing!
Harvestland
December 18, 2014 at 10:05 PM
How fabulously easy with more than a touch of decadence.
Courtney Sue Smith
December 14, 2014 at 12:41 PM
So glad I found this recipe on Pinterest! It was beyond delicious, and easier to make than I thought it would be. It tasted great paired with rice. We’re a family of picky eaters, but all agree that this is a new family favorite. Can’t go wrong with these yummy ingredients! Thank you for sharing!
Danita
December 14, 2014 at 3:22 PM
Thanks so much Courtney! I really appreciate you taking the time to stop by and let me know. I’m so glad you liked it. You’re right, what’s not to love about chicken, bacon and cheese? Merry Christmas!
becky
December 8, 2014 at 2:19 PM
Could you use boneless skinless thighs? if so, how long would you cook it for?
Danita
December 8, 2014 at 9:21 PM
Sure Becky, boneless thighs should work fine. Depending on the thickness they probably wouldn’t take quite as long as breasts. I haven’t ever cooked with boneless thighs, but my mom loves them. I’d check them after about 15-20 min and go from there. Thanks so much for stopping by. I’d love to hear how they turn out. Merry Christmas!
jessbures
December 6, 2014 at 1:54 PM
OMG I made this last night…my new favorite chicken recipe! Seriously yummy! I am so glad I found you on pinterest and had the ingreds. to make it. I used mozzarella cheese though because it is all I had on hand lol but it worked great still!
Thanks so much for sharing it!
Jess
pinned and tweeted!!
Danita
December 6, 2014 at 3:37 PM
Thanks Jess! You’re right about the cheese…whatever you have works great. So glad you enjoyed it and took the time to stop by and let me know, and for the Twitter share. Hope you have a very Merry Christmas!
Laria
November 23, 2014 at 11:03 AM
Any suggestions for side dishes to serve with this?
Danita
November 23, 2014 at 5:03 PM
Laria, my favorite starches for this dish are buttered egg noodles, baked potatoes or wild rice. Green beans are my go-to green veggie for any kind of chicken. Thanks for stopping by and I hope you enjoy the recipe.
Pat
November 22, 2014 at 8:20 PM
Okay, so my wife made this a couple of weeks ago… WOW!!! I took some left overs to work and people were coming from all over the office sniffing their way to the lunchroom, everyone walked in and said “whats is that smell?” then stood there and drooled. She made it again tonight!!! I am sure this would be really good without the bacon, but it is a perfect example of how bacon makes everything better!!! Amazingly good. I can only reiterate what that famous 20th century philosopher Homer Simpson once said; “Yuuummmm, Bacon!”
Danita
November 23, 2014 at 5:34 AM
Pat, Thank you so much for taking your time to leave a comment. It’s always such an encouragement to know someone tried one of my recipes and loved it. I really appreciate your kind words. Have a blessed week and wonderful holiday season…and make sure to enjoy plenty of bacon!!!
Andrea G
November 15, 2014 at 7:22 PM
Made this tonight. Yummy & easy. I like browning/frying on the stove, and then finishing off in the oven. When I only do it on the stove, I always worry it’s not totally done and often end up burning it (in an attempt to make sure it’s thoroughly done) 🙂 I threw in some bread crumbs with the parm cheese, garlic powder, salt, and pepper. Also, before I put on the Asiago Cheese and broiling, I put just a little ranch dressing on each piece of chicken. Thanks for the recipe!
Danita
November 15, 2014 at 7:33 PM
Andrea,
Thanks so much for your comment! I’m so glad you enjoyed it and it turned out well. I know exactly what you mean about getting chicken done on the stove. It seemed we were having to microwave someone’s in the middle of dinner because it wasn’t quite done enough. I love your added extras! I’m going to have to give the ranch a try…great idea! Have a blessed weekend and thanks again for stopping by!
Hailey
November 12, 2014 at 1:08 PM
This looks so good!! Could you do this without a wire rack?
Danita
November 13, 2014 at 5:29 AM
Hailey, I must have misread your question, so my reply doesn’t make any sense. Sorry, Yes you could do it without the wire rack. Using it just helps any fat that cooks from the chicken to drain off. Without the rack the bottom may be slightly less crispy but it should be just fine. Again, sorry.
bysarahhalstead
October 3, 2014 at 12:49 PM
This looks amazing!!!Yumm!!
Lucus
September 21, 2014 at 6:29 PM
My cheese stuck to the pan and nothing was left on the chicken. Any suggestions to prevent this?
Danita
September 21, 2014 at 6:39 PM
So Sorry! This has happened to me before. Often, if it’s not the pan, it means the oil isn’t hot enough when the food is placed in the pan. Make sure the oil is hot enough to sear the breading onto the meat.
Ashley
October 22, 2014 at 4:56 PM
Spray pan with olive oil and make sure your chicken is not wet before placing it in the egg. Dry chicken with a paper towel.
Marjie
September 2, 2014 at 12:03 PM
Instead of frying could you just bake this instead? Would that work
Danita
September 2, 2014 at 12:13 PM
You could just bake it but the crust wouldn’t be crispy. You could just fry it enough to brown the crust slightly then pop it in the oven.
Alli
August 12, 2014 at 4:47 AM
This looks so good! Cheese, bacon, chicken – my family will love this!
Brittany
August 6, 2014 at 8:38 PM
Garlic powder? Garlic salt? Fresh garlic?
Danita
August 7, 2014 at 7:00 AM
Thanks Brittany. In most of my recipes I usually use minced garlic, but in this one garlic powder is what you need. Although, you could substitute the garlic salt and leave out the extra salt. Thanks for stopping by!
Mommy A to Z
July 13, 2014 at 12:31 PM
This looks great! My husband and daughter love bacon! Thanks for linking up at the Manic Mondays blog hop! This week’s hop is live at http://mommyatozblog.com/Get-Linky/. Hope to see you there!
Catherine
July 12, 2014 at 6:37 PM
At what temp do you cook the chicken in the oven for baking?
Danita
July 13, 2014 at 6:29 AM
Thanks Catherine for asking…I didn’t even realize I left that out! I bake the chicken at 350. Thanks for stopping by!
Nicky
June 23, 2014 at 2:25 PM
I love anything with bacon. This recipe is no exception. Thanks so much for sharing it with us at the Let’s Get Real link party.
Leslie
June 17, 2014 at 9:25 AM
I absolutely love Parmesan crusted chicken! Yum! I’ve never made it though, interesting. I think I could tackle this.. I can’t add the bacon though. Prom gives me migraines, boo! Thanks for sharing.
Caroline
June 17, 2014 at 8:11 AM
I have cooked something similar to this. The only major change is that I do not fry the chicken. I bake the chicken with out the egg. It is very good.
Ivan
July 12, 2014 at 3:01 AM
Shouldn’t the chicken be dipped into the egg and then into the breadcrumbs and not the cheese?
Ivan
July 12, 2014 at 3:06 AM
Just read recipe again and see there is no breadcrumbs, just the grated cheese.
Danita
July 12, 2014 at 6:14 AM
Yes, Ivan you’re correct. No breadcrumbs, just grated Parmesan..not freshly grated but the kind you’d get in the plastic “can” used to sprinkle on spaghetti or pizza. We call it “sprinkle cheese”. It gives it a really great crust and different flavor. The Asiago (or you could use another kind if you like) is melted on top after you finish cooking it. Hope that helps. Thanks so much for stopping by!
Danita
July 12, 2014 at 6:18 AM
I just read back over it as well. The cheese used to top is the Asiago, which probably wasn’t clear enough. Thanks for letting me know!
Comments are closed.